
For the latest information about this product (system requirements, compatibility information, etc.), visit alesis.com/samplepad-pro .
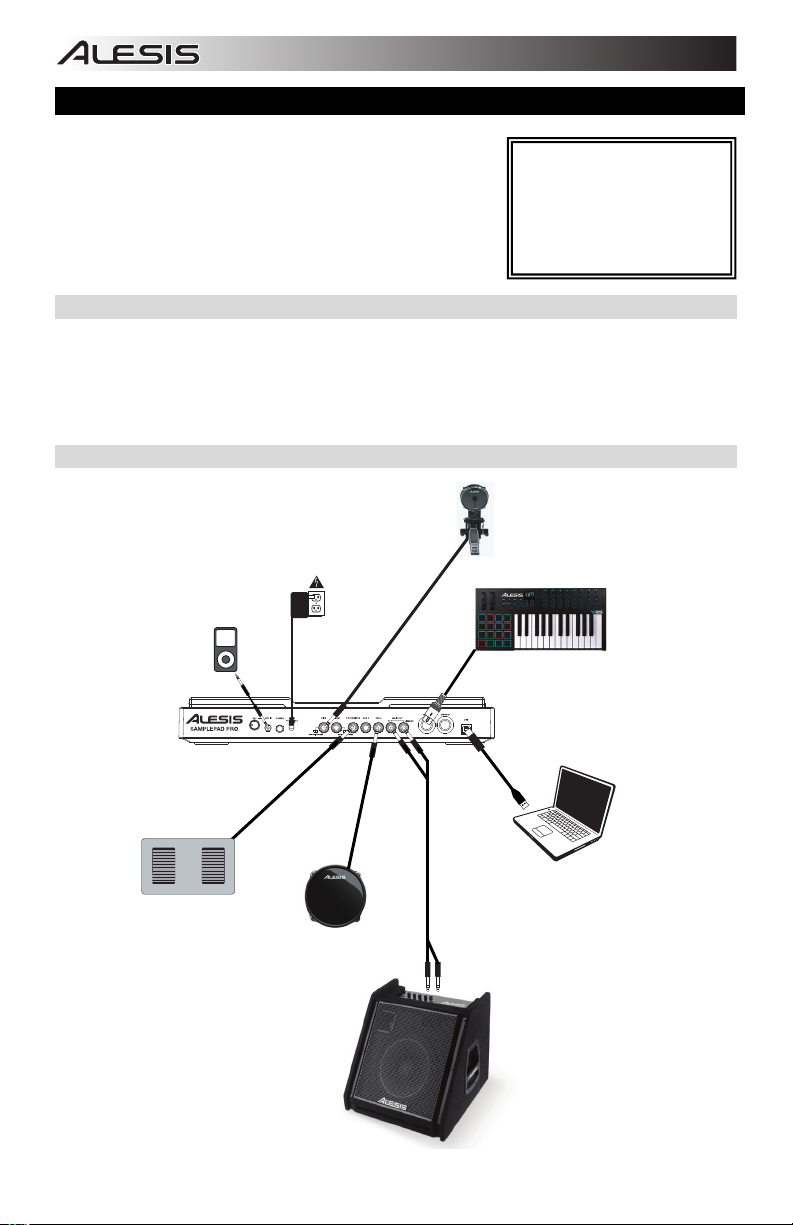
For additional product support, visit alesis.com/support. Connection Diagram Footswitch* Box Contents SamplePad Pro Power Adapter User Guide Safety Instructions & Warranty Information Booklet Kick Pad* ("Trigger") External MIDI Device (Keyboard, Drum Module, * Sold separatel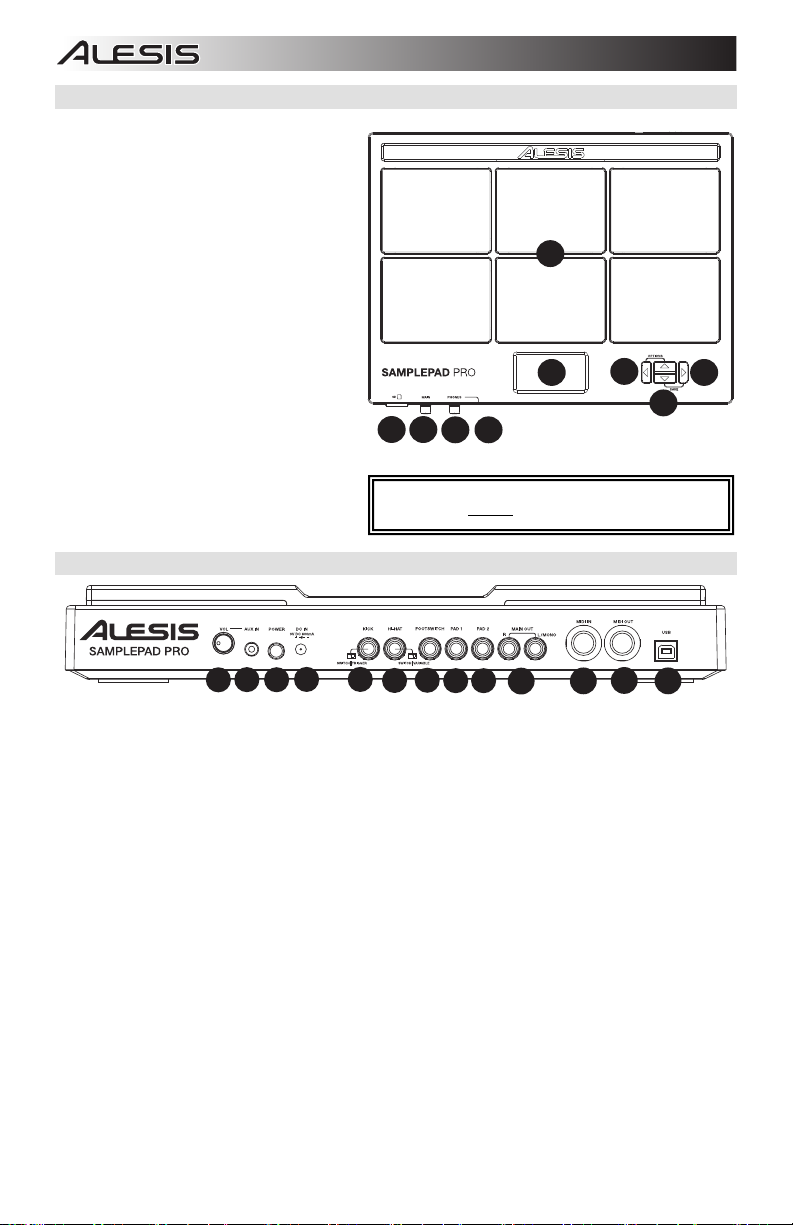
1. Pad : Strike these single-zone pads with a drumstick. A LED around the pad will illuminate when that pad is struck.
2. LCD : Displays the current parameters and other operations. 3. Cursor Left : Press this button to decrease the value of a parameter.4. Cursor Up/Down : Press these buttons to move up and down through the available parameters or menu options.
5. Cursor Right : Press this button to increase the value of a parameter or enter a submenu. 6. SD Card Slot : Insert a standard SD card (not included) containing .WAV samples into this slot. 7. Main Volume: Adjusts the overall volume level for the Main Out. 8. Phones Volume : Adjusts the overall volume level for the Phones Out. 9. Phones Out : Connect a pair of 1/4" headphones to this output. Rear Panel Features WARNING: Put on your headphones or turn on your speakers only AFTER turning on SamplePad Pro. 1. Aux In : Connect a phone, CD player, or media player to this input using a stereo 1/8" cable. 2. Aux In Volume : Adjusts the level of the device connected to the Aux Input.3. Power Switch: Press this button to turn SamplePad Pro on. Hold this button for two seconds and release to turn SamplePad Pro off.
4. DC Input : Connect the included power adapter here, then connect the adapter to wall power.5. Kick Pedal Input: Connect a kick trigger or footswitch here using a 1/4" TS cable to use this input as a kick trigger while playing. Select "SWITCH" if you are using a footswitch or switch trigger. Select "TRIGGER" if you are using a velocity-sensitive pedal or velocity-sensitive kick trigger.
6. Hi-Hat Input : Connect a Hi-Hat pedal here using a 1/4" TS cable to use this input to control the position of a HiHat while playing. Select "SWITCH" if you are using a standard footswitch. Select "VARIABLE" if you are using a variable hi-hat pedal.
7. Footswitch Input : Connect a standard 1/4" TS single-button or 1/4" TRS dual-button footswitch here to control functions assigned in the Footswitch options menu.
8. Pad 1 : Connect a dual-zone or single-zone drum pad, cymbal pad, or trigger to this input using a 1/4" TRS cable for dual-zone or a 1/4" TS cable for single-zone. You can use this input to trigger samples assigned to the EXT 1A and EXT 1B trigger location of each kit on SamplePad Pro.
9. Pad 2 : Connect a single-zone drum pad, cymbal pad, or trigger to this input using a 1/4" TS cable. You can use this input to trigger samples assigned to the EXT 2 trigger location of each kit on SamplePad Pro.
10. Main Out : Use standard 1/4" cables to connect this output to a speaker or amplifier system. (For mono sound, connect a cable only to the Left output.)
11. MIDI In : Use a standard five-pin MIDI cable to connect this input to the MIDI OUT of an external MIDI device.
12. MIDI Out : Use a standard five-pin MIDI cable to connect this output to the MIDI IN of an external MIDI device.
13. USB/MIDI Port : Connect SamplePad Pro to a computer to send and receive MIDI data or load samples to the SD card.
We recommend using the Alesis DMHat Pedal with SamplePad Pro.
3. Sample Name : Displays the sample that is currently assigned to the velocity layer of the trigger location being edited.
4. Trigger Location: Displays the trigger location that is currently being edited.5. Velocity Layer: Displays the velocity layer of the trigger location that is currently being edited.
6. Other Parameters: Displays the tuning, sensitivity, panning, reverb, level, MIDI Note, mode, and mute group parameters of the velocity layer that is currently being edited.
Basic Operations Selecting the Kit: 1. Press the Cursor Up or Cursor Down buttons to highlight the kit number. 2. Press the Cursor Left or Cursor Right buttons to scroll through the available kits. 3. Hold down the Cursor Left or Cursor Right buttons to rapidly scroll through the kits. Assigning a Sample to a Pad or Ext. Trigger:1. Move the cursor to the Trigger Location parameter by pressing the Cursor Up or Cursor Down buttons.
2. Use the Cursor Left or Cursor Right buttons to select the pad or ext. trigger that you would like to assign the
3. Move the cursor to the Sample Location parameter by pressing the Cursor Up or Cursor Down buttons.
4. Use the Cursor Left or Cursor Right buttons to select the location of the sample that you would like to assign.
(internal or card) 5. Move the cursor to the Sample Name parameter by pressing the Cursor Up or Cursor Down buttons.6. Use the Cursor Left or Cursor Right buttons to browse the internal memory or SD card and select the sample
that you would like to assign to this trigger location. Velocity Layers:You can load up to 2 samples (referred to as Layers) per 1 pad or trigger input. The 2 Layers are referred to as A and B and they can only be accessed if you are using samples from a SD card (LOC:CARD). You can select a velocity range setting (shown as Vel: 000-127) for each of these layers, so that each sample will only trigger when a pad or external trigger is struck with that velocity amount. If multiple layers are set to the same velocity range on a pad or external trigger input, they will both trigger at the same time when the pad or external trigger is struck.
To assign a sound to one of the layers of a pad or ext. trigger:1. Move the cursor to the Sample Location parameter by pressing the Cursor Up and Cursor Down buttons.
2. Use the Cursor Left or Cursor Right buttons to set the Sample Location to LOC:CARD. 3. Move the cursor to the Layer parameter by pressing the Cursor Up or Cursor Down buttons. 4. Use the Cursor Left or Cursor Right buttons to select the layer that you would like to configure. 5. Move the cursor to the "Vel:" parameter by pressing the Cursor Up or Cursor Down buttons.6. Use the Cursor Left or Cursor Right buttons to adjust the velocity range to configure when the sample
7. Move the cursor to the Sample Name parameter by pressing the Cursor Up or Cursor Down buttons.8. Use the Cursor Left or Cursor Right buttons to browse the SD card and select the sample that you would like
assigned to this layer should play. to assign to this layer.
We recommend formatting your SD card to a FAT32 file system (if it is not already) and naming your sample files according to this format. Basically, this means:
• Do not use these characters: " * / \ : < >? | • Do not use spaces. • Limit your file name to 8 characters (excluding the file extension, ".WAV").• You can assign up to 48 MB worth of samples per kit (the sample library on your SD card can be larger, of
course). Also, please note that a sample's size will be rounded up when loaded (e.g., a 2.1 MB sample on the SD card will be treated as a 3 MB sample when it is assigned to a pad).
• The max number of files that can be located in the root directory is 512. • When a .WAV file is selected, it will take a few seconds to load into the memory.• SamplePad Pro supports mono or stereo .WAV files, with a sample rate of 48K, 44.1K, 32K, 22.05K, and
• When there is no SD card inserted, it is not possible to select the card location. Editing Layer Parameters To adjust the pitch of a sample: 1. Strike a pad or ext. trigger. 2. Move the cursor to the TUNE area by pressing the Cursor Up or Cursor Down buttons.3. Then press the Cursor Left or Cursor Right button to adjust the tuning. [-4, -3, -2, -1, 0, 1, 2, 3, 4]
To adjust the reverb level of a sample: 1. Strike a pad or ext. trigger. 2. Move the cursor to the REV (Reverb) area by pressing the Cursor Up or Cursor Down buttons. 3. Then press the Cursor Left or Cursor Right button to adjust the reverb level. [0-10] To adjust the sensitivity of the pad or ext. trigger: 1. Strike a pad or ext. trigger. 2. Move the cursor to the SENS (Sensitivity) area by pressing the Cursor Up or Cursor Down buttons. 3. Then press the Cursor Left or Cursor Right buttons to adjust the sensitivity level. [1-8] To adjust the volume level of a sample: 1. Strike a pad or ext. trigger. 2. Move the cursor to the LEV (Level) area by pressing the Cursor Up or Cursor Down buttons. 3. Then press the Cursor Left or Cursor Right button to adjust the level. [0-10] To adjust the panning of a sample: 1. Strike a pad or ext. trigger. 2. Move the cursor to the PAN area by pressing the Cursor Up or Cursor Down button.3. Then press the Cursor Left or Cursor Right button to adjust the pan position. [L4, L3, L2, L1, CTR, R1, R2, R3, R4]
To adjust the MIDI note sent by the Trigger Location: 1. Strike a pad or ext. trigger. 2. Move the cursor to the MIDI area by pressing the Cursor Up or Cursor Down button. 3. Then press the Cursor Left or Cursor Right button to adjust the MIDI note number. [00-127] Note: The MIDI note does not have an effect on the internal sound.
Each new pad or ext. trigger strike will trigger the assigned sample and overlap the sound from the previous strike of the same trigger location.
• MONO (Monophonic)Each new pad or ext. trigger strike will trigger the assigned sample and stop the sound from the previous strike of the same trigger location.
After a pad or ext. trigger is struck, the sample will continue to playback from the beginning after it reaches the end of the sample. To stop the loop, strike the pad or ext. trigger again.
After the pad or ext. trigger is struck, all samples currently being played by SamplePad Pro will be muted.
Strike the pad or ext. trigger several times in the TMP mode to set the tempo of the metronome. Strike the pad or ext. trigger to start or stop the metronome (click) playback.When a pad or ext. trigger is in HAT mode, striking this pad or ext. trigger will trigger one of the sample assigned to the 5 hi-hat locations of each kit (HAT OPE, HAT MID, HAT CLO, HAT CHK, HAT SPL). The position of the hi-hat pedal (sold separately) will determine which of the 5 currently assigned hi-hat samples of the kit will trigger.
Mute GroupsNormally, when you strike a pad or ext. trigger when another pad is playing back, the samples of these two pads will be played back overlapped. With the mute group function, you can stop the playback of the sample of a pad when you strike another pad or ext. trigger. For example, you can simulate a hi-hat by setting an open hi-hat sound to one pad, and then setting a closed hi-hat sound to another pad. Then after setting both pads to the same mute group, these sounds will mute each other out, similar to a real hi-hat.
To assign a pad or ext. trigger to a mute group: 1. Strike one of the pads or ext. triggers that you want to assign to a Mute Group.2. Move the cursor to the MGRP (Mute Group) area by pressing the Cursor Up or Cursor Down buttons and use the Cursor Left or Cursor Right buttons to select a Mute group. [1-16]
3. Strike another pad or ext. trigger, navigate to the MGRP, and use the Cursor Left or Cursor Right buttons to set this pad to the same number you set for the first pad.
Options MenuSamplePad Pro’s Options menu contains global settings that affect the overall operation as well as system-related information and functions.
To enter the Options menu and change these global settings:1. Press and hold the Cursor Up and Cursor Left buttons for 2 seconds to enter the main Options menu.
2. Press the Cursor Up and Cursor Down buttons to highlight the submenu that you would like to enter, then press Cursor Right to enter the submenu.
3. Press Cursor Up and Cursor Down to highlight the parameter that you would like to enter, then press Cursor Left and Cursor Right to edit the parameter.
4. To exit a submenu or the main Options menu, press and hold Cursor Up and Cursor Left for 2 seconds.
1. Press and hold the Cursor Down and Cursor Right buttons for 2 seconds to enter the main Save menu.
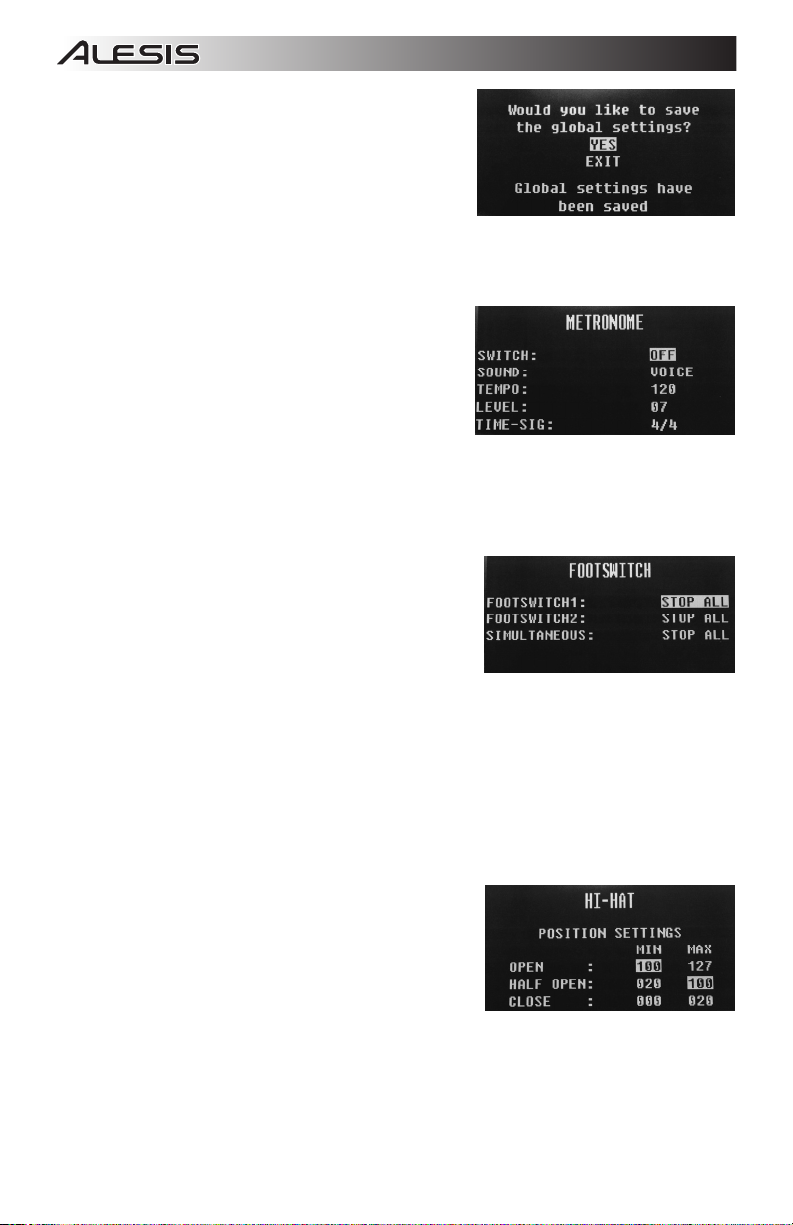
2. Press the Cursor Up and Cursor Down buttons to highlight SAVE GLOBAL SETTINGS, 3. Press Cursor Right to enter the SAVE GLOBAL SETTINGS submenu.4. Press the Cursor Up and Cursor Down buttons to highlight YES and press Cursor Right to save the global settings.
5. To exit the SAVE GLOBAL SETTINGS submenu, press the Cursor Down until Exit is highlighted, and then press the Cursor Right button. Alternatively, press and hold the Cursor Down and Cursor Right buttons to exit this menu.
• Switch: Turns the metronome on or off. • Sound: Selects the sound of the metronome from Voice, • Tempo: Adjusts the tempo of the metronome from 30-280 • Level: Adjusts the volume of the metronome from 0-10.• Time: Adjusts the time signature for the metronome. The available time signatures to select from are 1/2, 1/4,
Metronome, Claves, Sticks, Cowbell, and Beep. BPM (Beats per Minute).1/8, 1/16, 2/2, 2/4, 2/8, 2/16, 3/2, 3/4, 3/8, 3/16, 4/2, 4/4, 4/8, 4/16, 5/2, 5/4, 5/8, 5/16, 6/2, 6/4, 6/8, 6/16, 7/2, 7/4, 7/8, 7/16, 8/2, 8/4, 8/8, 8/16, 9/2, 9/4, 9/8, and 9/16.
FootswitchThe footswitch input of SamplePad Pro supports both standard 1/4" TS single-button and 1/4" TRS dual-button footswitches.
For 1/4" TS single-button footswitches, you can only assign one function to the single button by changing the setting for FOOTSWITCH1.
For 1/4" TRS dual-button footswitches, you can assign functions to both buttons by changing the settings for FOOTSWITCH1 and FOOTSWITCH2. You can also assign a function to happen when you press both buttons of the footswitch at the same time by changing the setting for SIMULTANEOUS.
The available footswitch functions are: • Click: Starts/stops the metronome • Stop All: Mutes all currently playing samples • Next Kit: Selects the next kit • Prev Kit: Selects the previous kit • Tempo: Press the footswitch several times to set the tempo of the metronome • Position Settings: This submenu allows you to adjust the hi-hat pedal ranges for the "HAT OPE", "HAT MID", and "HAT CLO" trigger locations of SamplePad Pro.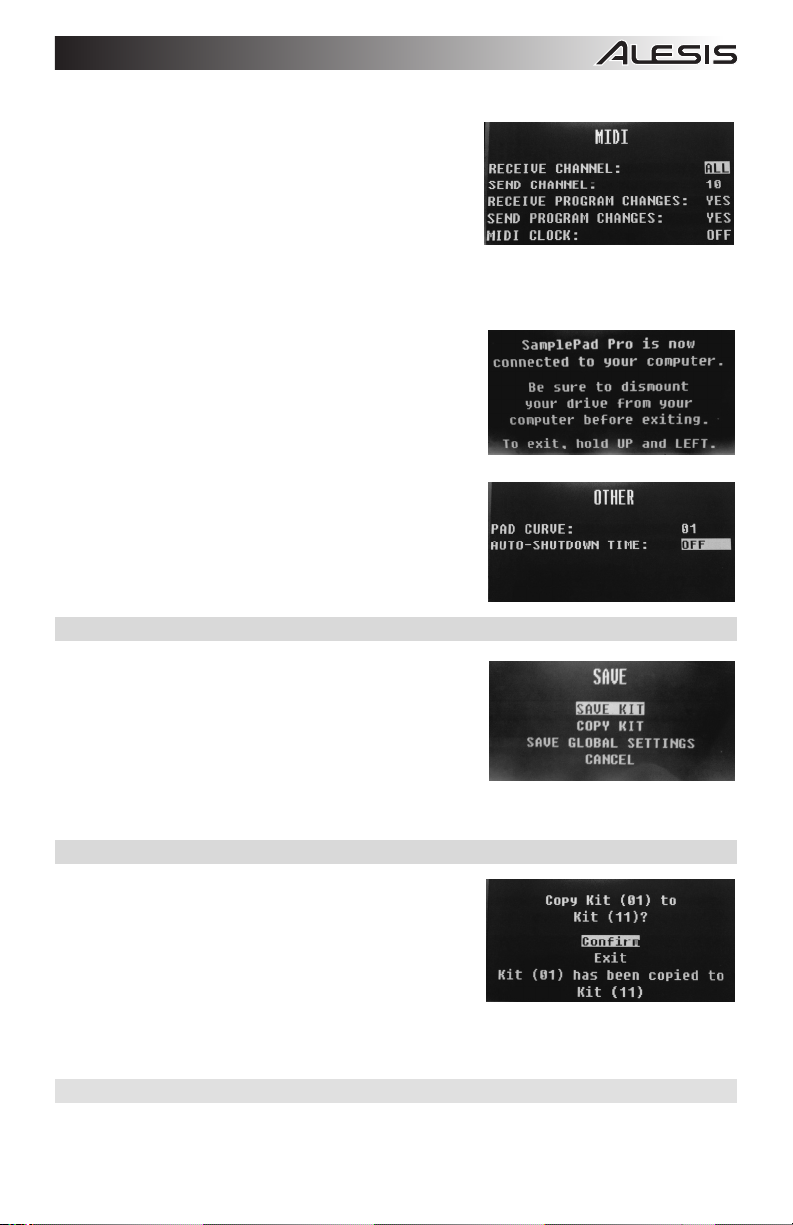
react to program change messages received on the MIDI Receive Channel. The available parameters are Yes and No.
• Send Program Changes: Sets whether SamplePad Pro will send program changes over the MIDI Send Channel when a kit is changed. The available parameters are Yes and No.
• Ext. Clock: Sets whether the SamplePad Pro will send or receive MIDI Clock. This feature can also be set to
Load Samples/Kits Via USB • After this feature is selected, SamplePad Pro will connect to yourMac or PC via the USB connection for easy SD card management. To exit this mode, hold Cursor Left and Cursor Up on SamplePad Pro for two seconds.
• Pad Curve: Selects the velocity curve sensitivity setting (1-8) to be used across all of the internal pads. You can audition the Pad Curve by striking a pad while changing this setting.
• Auto-Shutdown Time: Selects how long SamplePad Pro will remain powered on if there is no activity. Select from 30 minutes, 60 minutes, or Off (SamplePad Pro will remain powered on until you manually power it off).
Saving a Kit 1. Select the kit on the main screen that you have edited and would like to save.2. Press and hold the Cursor Down and Cursor Right buttons for 2 seconds simultaneously to enter the Save menu.
3. Move the cursor to the SAVE KIT option by pressing the Cursor Up or Cursor Down buttons. 4. Press Cursor Right to enter the SAVE KIT submenu. 5. Press Cursor Up or Cursor Down to highlight "Yes" and then press Cursor Right to save the kit.6. To exit the SAVE KIT submenu, press the Cursor Down until Exit is highlighted, and then press the Cursor Right button. Alternatively, press and hold the Cursor Down and Cursor Right buttons to exit this menu.
Copying a Kit 1. Press and hold the Cursor Down and Cursor Right buttons for 2 seconds to enter the Save menu. 2. Move the cursor to the COPY KIT option by pressing the Cursor Up or Cursor Down buttons. 3. Press Cursor Right to enter the COPY KIT submenu. 4. Press Cursor Left or Cursor Right to select the kit that you would like to copy.5. Press Cursor Down and then press Cursor Left or Cursor Right to select the location that you would like to copy the kit to.
6. Press Cursor Down to highlight Confirm and then Cursor Right to copy the kit.7. To exit the COPY KIT submenu, press the Cursor Down until Exit is highlighted, and then press the Cursor Right button. Alternatively, press and hold the Cursor Down and Cursor Right buttons to exit this menu.
Factory ResetTo reset the internal kits and global settings to the factory default settings, hold the Cursor Left and Cursor Right buttons while powering on the SamplePad Pro. This will not affect samples or kits stored on your SD card.
1. Asegúrese de que todos los artículos indicados en “Contenido de la caja" estén incluidos en la caja.
2. LEA EL FOLLETO DE INSTRUCCIONES DE SEGURIDAD ANTES DE UTILIZAR EL PRODUCTO. 3. Estudie el diagrama de conexión. Para registrar el producto, visite alesis.com.Para obtener la información más reciente acerca de este producto (requisitos de sistema, información de compatibilidad, etc.), visite alesis.com/samplepad-pro.
Para soporte adicional del producto, visite alesis.com/support. Diagrama de conexión Reproductor multimedia* Interruptor de Suministro Contenido de la caja SamplePad Pro Adaptador de corriente Guía del usuario Folleto de instrucciones de seguridad e información sobre la garantía Pad de bombo* ("Disparador") Dispositivo MIDI externo (teclado, módulo de batería, Computadora* Amplificador* *Se vende por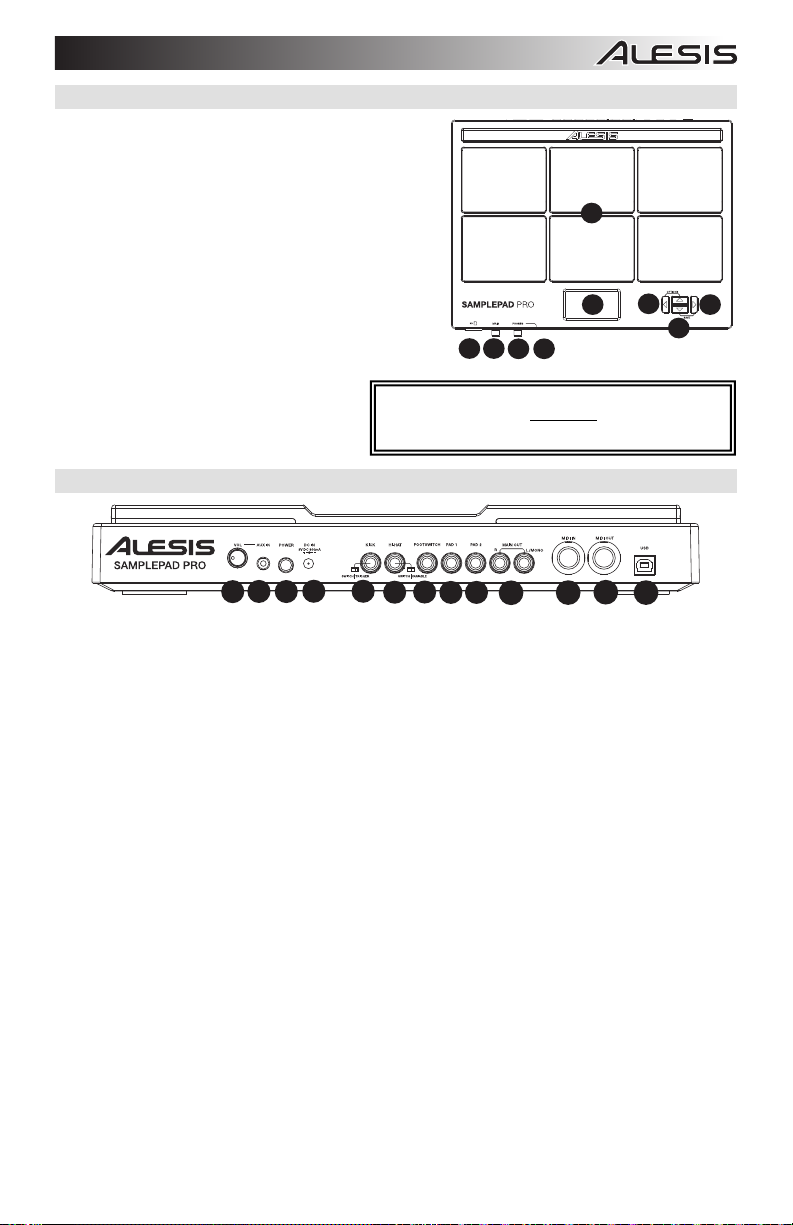
1. Pad : Golpee estos pads de una sola zona con una baqueta. Se iluminará un LED alrededor del pad cuando se golpee ese pad.
2. LCD : Muestra los parámetros y otras operaciones en ejecución en ese momento. 3. Cursor izquierdo : Pulse este botón para disminuir el valor del parámetro.4. Cursor arriba/abajo : Pulse estos botones para desplazarse hacia arriba y abajo a través de los parámetros u opciones del menú disponibles.
5. Cursor derecho : Pulse este botón para aumentar el valor del parámetro o entrar a un submenú.6. Ranura para tarjetas SD : Inserte en esta ranura una tarjeta SD estándar (no incluida) que contenga muestras .WAV.
7. Volumen principal : Ajusta el volumen general de la salida Main Out. 8. Volumen de los auriculares : Ajusta el volumen general de la salida Phones Out. 9. Salida para auriculares : Conecte un par de auriculares de 1/4 pulg. a esta salida.ADVERTENCIA: Colóquese los auriculares o encienda sus altavoces sólo DESPUÉS de encender el SamplePad Pro.
Características del panel trasero1. Entrada auxiliar : Conecte a esta entrada un teléfono, un reproductor de CD o un reproductor de medios mediante un cable estéreo de 1/8 pulg.
2. Volumen de la entrada auxiliar : Ajusta el nivel del dispositivo conectado a la entrada auxiliar.3. Interruptor de encendido : Pulse este botón para encender el SamplePad Pro. Mantenga pulsado este botón durante dos segundos y suéltelo para apagar el SamplePad Pro.
4. Entrada de CC : Conecte aquí el adaptador de alimentación incluido y conecte luego el adaptador al tomacorriente de pared.
5. Entrada del pedal de bombo : Conecte aquí un disparador de bombo o interruptor de pedal mediante un cable TS de 1/4 pulg. para utilizar esta entrada como disparador de bombo al tocar. Seleccione "SWITCH" si está utilizando un interruptor de pedal o un interruptor disparador. Seleccione "TRIGGER" si está usando un pedal sensible a la velocidad o un disparador de bombo sensible a la velocidad.
6. Entrada de Hi-Hat : Conecte aquí un pedal de Hi-Hat mediante un cable TS de 1/4 pulg. para utilizar esta entrada para controlar la posición de un Hi-Hat al tocar. Seleccione "SWITCH" si está usando un interruptor de pedal estándar. Seleccione "VARIABLE" si está usando un pedal de hi-hat variable. pedal Alesis DMHat Pedal con el SamplePad Pro.
7. Entrada del interruptor de pedal : Conecte aquí un interruptor de pedal estándar TS de 1/4 pulg. de un sólo botón o TRS de 1/4 pulg. de dos botones para controlar las funciones asignadas en el menú de opciones del interruptor de pedal.
8. Pad 1 : Conecte a esta entrada un pad de batería, pad de platillo, o disparador de una o dos zonas mediante un cable TRS de 1/4 pulg. para zona doble o un cable TS de 1/4 pulg. para una sola zona. Puede utilizar esta entrada para disparar muestras asignadas a las ubicaciones de disparo EXT 1A y EXT 1B en cada kit del SamplePad Pro.
9. Pad 2 : Conecte a esta entrada un pad de batería, pad de platillo, o disparador mediante un cable TS de 1/4 pulg. Puede utilizar esta entrada para disparar muestras asignadas a la ubicación de disparo EXT 2 en cada kit del SamplePad Pro.
10. Salida principal : Utilice cables TRS de 1/4 pulg. estándar para conectar esta salida a un altavoz o sistema amplificador. (Para lograr sonido monofónico, conecte un cable sólo a la salida izquierda.)
11. Entrada MIDI : Utilice un cable MIDI estándar de cinco patillas para conectar esta entrada a la SALIDA MIDI de un dispositivo MIDI externo.
12. Salida MIDI : Utilice un cable MIDI estándar de cinco patillas para conectar esta salida a la ENTRADA MIDI de
13. Puerto USB/MIDI : Conecte el SamplePad Pro a un ordenador para enviar y recibir datos MIDI o para cargar